
Introduction
Speed is one of the most important things a pilot must monitor during flight. An aircraft must fly within a safe speed range during takeoff, climb, cruise, approach, and landing. If it flies too slowly, it may lose lift. If it flies too fast, it may put unnecessary stress on the aircraft structure.
The cockpit instrument that helps pilots monitor aircraft speed is called the airspeed indicator.
For beginners, the airspeed indicator may look like a simple speed gauge, but it plays a very important role in aircraft safety and control. It helps pilots know whether the aircraft is flying at the right speed for each phase of flight.
This guide, Airspeed Indicator Explained for Beginners, will help aviation students, beginner pilots, flight simulator users, and aircraft learners understand the airspeed indicator in simple English.
What Is an Airspeed Indicator?
An airspeed indicator is a flight instrument that shows how fast an aircraft is moving through the air. It is usually found in front of the pilot on the cockpit instrument panel.
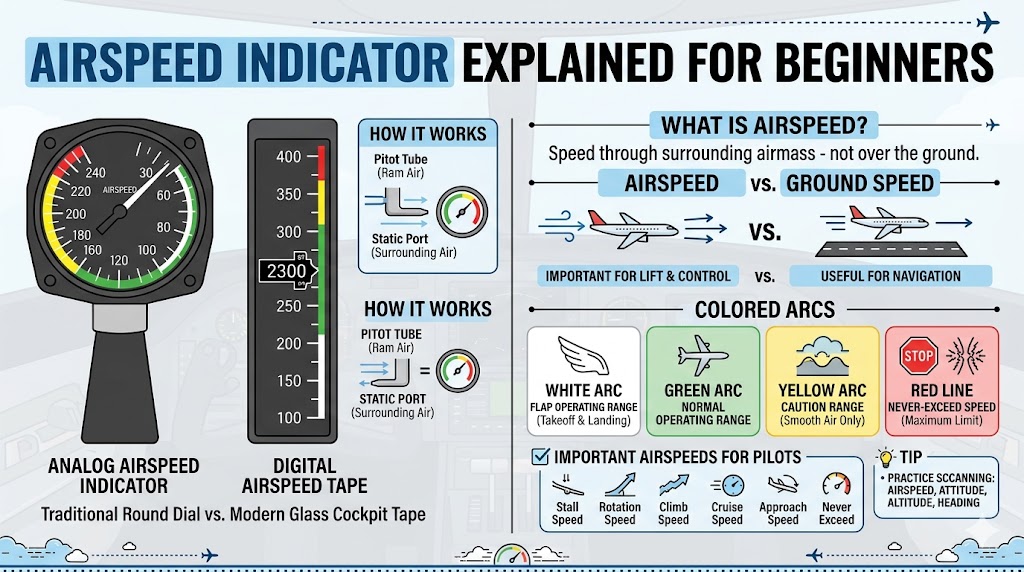
In traditional aircraft, the airspeed indicator is a round dial with a needle. In modern glass cockpit aircraft, airspeed is often shown as a digital vertical speed tape on the Primary Flight Display.
The airspeed indicator is one of the basic flight instruments because it helps pilots maintain safe control of the aircraft.
It is used during:
- Takeoff
- Climb
- Cruise
- Turns
- Descent
- Approach
- Landing
- Emergency handling
A pilot does not simply look at airspeed once. Airspeed is checked regularly throughout the flight because aircraft performance changes with power, pitch, weight, wind, and aircraft configuration.
Why Beginners Should Learn the Airspeed Indicator
Beginners should learn the airspeed indicator early because speed control is one of the foundations of safe flying.
Aviation learners must understand airspeed because it helps with:
- Safe takeoff
- Correct climb speed
- Smooth cruise flight
- Controlled descent
- Stable approach
- Safe landing
- Stall prevention
- Better aircraft handling
- Understanding pilot decisions
A beginner may think speed is only about going fast or slow, but in aviation, speed has a direct connection with lift, control, safety, and aircraft performance.
For example, during landing, the aircraft must not be too fast or too slow. If it is too fast, landing distance may increase. If it is too slow, the aircraft may become unstable or approach stall condition.
This is why the airspeed indicator is one of the first cockpit instruments students should understand.
What Does Airspeed Mean in Aircraft?
Airspeed means the speed of the aircraft through the surrounding air.
This is different from the speed of the aircraft over the ground. The aircraft moves inside a moving air mass. If wind is blowing from the front or back, the aircraft’s speed over the ground may be different from the speed shown on the airspeed indicator.
For beginners, think of airspeed as the speed that matters for aircraft control and lift.
The wings need airflow to create lift. The airspeed indicator helps pilots know whether enough air is flowing over the wings for safe flight.
If the aircraft has enough airspeed, the wings can produce proper lift. If airspeed becomes too low, the aircraft may lose lift and stall.
Airspeed vs Ground Speed
Airspeed and ground speed are not the same. This is one of the most common beginner confusions.
Airspeed is the speed of the aircraft through the air. Ground speed is the speed of the aircraft over the ground.
| Feature | Airspeed | Ground Speed |
|---|---|---|
| Meaning | Speed through the air | Speed over the ground |
| Used For | Aircraft control and lift | Navigation and arrival time |
| Affected By | Air pressure and airflow | Wind direction and wind speed |
| Shown On | Airspeed indicator | GPS or navigation display |
| Important For | Takeoff, climb, landing, stall prevention | Route planning and time calculation |
| Example | Aircraft flies through air at 100 knots | Aircraft moves over ground at 115 knots with tailwind |
For example, if an aircraft is flying with a strong tailwind, its ground speed may be higher than its airspeed. If it is flying into a strong headwind, its ground speed may be lower than its airspeed.
Pilots care about both, but for controlling the aircraft safely, airspeed is extremely important.
Main Parts of an Airspeed Indicator
A traditional airspeed indicator has several important parts. Beginners should understand these step by step.
Speed Scale
The speed scale shows numbers around the instrument. These numbers represent airspeed, usually in knots.
Needle
In an analog cockpit, the needle points to the current indicated airspeed. As speed increases or decreases, the needle moves around the dial.
Digital Speed Tape
In a glass cockpit, airspeed may appear as a vertical tape instead of a round gauge. The current speed is displayed clearly on the tape.
Colored Arcs
Colored arcs show safe and caution speed ranges. These colors help pilots understand how the aircraft should be operated.
Speed Markings
Some airspeed indicators include markings for important aircraft speeds such as stall speed, flap speed, normal operating range, and never-exceed speed.
These markings are not decoration. They provide important safety guidance.
Colored Arcs on the Airspeed Indicator
The colored arcs on an airspeed indicator help pilots understand safe speed ranges quickly. These colors are especially useful for beginners because they make the instrument easier to read.
White Arc
The white arc usually shows the flap operating range.
Flaps are movable surfaces on the wings that help the aircraft fly slower during takeoff and landing. The white arc shows the speed range where flaps can normally be used.
The lower end of the white arc is related to stall speed with flaps extended. The upper end shows the maximum speed at which flaps can be extended safely.
For beginners, the white arc is closely connected with landing and slow-speed flight.
Green Arc
The green arc shows the normal operating speed range of the aircraft.
This is the speed range where the aircraft can usually be flown safely in normal conditions without special caution.
Pilots often operate in the green arc during normal flight. It is one of the most important ranges for beginners to recognize.
The lower end of the green arc is related to stall speed without flaps. The upper end shows the maximum normal operating speed.
Yellow Arc
The yellow arc shows the caution range.
The aircraft can fly in this range only in smooth air and with care. Pilots avoid flying in the yellow arc during turbulence or rough air because higher speed can put more stress on the aircraft.
For beginners, the yellow arc means: be careful. It is not a normal everyday operating range in rough conditions.
Red Line
The red line shows the never-exceed speed.
This is the maximum speed limit of the aircraft. Pilots must not intentionally fly beyond this speed because it may damage the aircraft structure.
For beginners, the red line is the strongest warning on the airspeed indicator. It means the aircraft should not be operated beyond that speed.
Important Airspeed Terms Beginners Should Know
Airspeed has several important terms. Beginners do not need to master every advanced detail at once, but these basic terms are useful.
Indicated Airspeed
Indicated airspeed is the speed shown directly on the airspeed indicator. It is the speed pilots commonly use during normal flying.
True Airspeed
True airspeed is the actual speed of the aircraft through the air, corrected for altitude and temperature effects. At higher altitudes, true airspeed may be different from indicated airspeed.
Ground Speed
Ground speed is the speed of the aircraft over the ground. It is affected by wind and is often shown by GPS or navigation systems.
Stall Speed
Stall speed is the speed below which the wing may not produce enough lift for normal flight. If the aircraft slows too much, it may stall.
Rotation Speed
Rotation speed is the speed during takeoff when the pilot gently raises the aircraft nose to lift off from the runway.
Best Climb Speed
Best climb speed is used to climb efficiently after takeoff. Different aircraft may have different climb speed values.
Approach Speed
Approach speed is the speed used during the final part of landing. It helps keep the aircraft stable and controlled before touchdown.
Never Exceed Speed
Never exceed speed is the maximum speed the aircraft should not cross. It is usually marked by the red line on the airspeed indicator.
How the Airspeed Indicator Works
The airspeed indicator works by using air pressure.
The aircraft has two important parts connected to the airspeed system:
- Pitot tube
- Static port
Pitot Tube
The pitot tube faces forward into the airflow. It collects moving air pressure as the aircraft flies through the air. This pressure is called ram air pressure.
Static Port
The static port measures the surrounding air pressure. This is the normal air pressure around the aircraft.
Pressure Difference
The airspeed indicator compares ram air pressure from the pitot tube with static pressure from the static port.
When the aircraft moves faster, ram air pressure increases. The airspeed indicator uses this difference to show speed.
In simple words, more airflow pressure means higher airspeed. Less airflow pressure means lower airspeed.
This is a basic explanation. Pilots and aircraft technicians study the system in more detail, but beginners only need to understand that the airspeed indicator uses air pressure to measure speed through the air.
How Pilots Use Airspeed During Flight
Pilots use airspeed during every phase of flight. The correct speed helps keep the aircraft safe, stable, and controllable.
Before Takeoff
Before takeoff, pilots check that the airspeed indicator is working properly. In many aircraft, the airspeed should read zero while the aircraft is stopped.
Pilots also review important takeoff speeds before beginning the takeoff roll.
Takeoff Roll
During the takeoff roll, the aircraft accelerates along the runway. The pilot checks that the airspeed indicator is increasing normally.
If the airspeed does not increase as expected, it may indicate a problem, and the pilot may need to reject the takeoff depending on the situation and procedure.
Rotation
At the correct rotation speed, the pilot gently raises the aircraft nose. This allows the aircraft to lift off the runway.
If rotation happens too early, the aircraft may not have enough speed. If it happens too late, more runway may be used than necessary.
Climb
After takeoff, pilots maintain a safe climb speed. This helps the aircraft gain altitude efficiently while maintaining control.
Airspeed during climb is important because the aircraft is still close to the ground and must remain safely above stall speed.
Cruise
During cruise, pilots use airspeed to maintain efficient and comfortable flight. The aircraft should fly within its normal operating range.
Cruise speed may depend on aircraft type, altitude, power setting, weather, and fuel planning.
Descent
During descent, pilots monitor airspeed carefully. If the aircraft descends too steeply or with too much power, speed may increase quickly.
Pilots control descent speed using pitch, power, drag, and planning.
Approach
Approach speed is very important for landing safety. A stable approach means the aircraft has the correct speed, descent rate, and alignment.
If approach speed is too high, landing distance may increase. If it is too low, the aircraft may become unstable or approach stall.
Landing
During landing, pilots monitor airspeed until close to touchdown. The aircraft must slow down safely while still remaining controllable.
Good speed control helps achieve smoother landings and better runway management.
Why Airspeed Is Important for Safety
Airspeed is directly connected to aircraft safety. Correct airspeed helps pilots avoid dangerous situations.
Airspeed helps prevent:
- Stalls
- Overspeed conditions
- Unstable approaches
- Hard landings
- Poor climb performance
- Loss of control
- Excessive aircraft stress
- Long landing rolls
A stall can happen when the wing no longer produces enough lift. This is often related to low airspeed and high angle of attack. Monitoring airspeed helps pilots stay aware of stall risk.
Overspeed is also dangerous. Flying too fast may damage aircraft parts or reduce safe control margins.
This is why pilots treat the airspeed indicator as one of the most important cockpit instruments.
Common Beginner Mistakes With Airspeed
Beginners often make some common mistakes while learning airspeed. Understanding these mistakes can help learners avoid confusion.
Confusing Airspeed With Ground Speed
Many beginners think GPS speed and airspeed are the same. They are different. Airspeed is used for aircraft control, while ground speed is used for movement over the ground.
Ignoring Speed During Turns
During turns, aircraft control and lift change. Beginners should continue monitoring airspeed during turns instead of focusing only on direction.
Flying Too Slow on Approach
A slow approach can become unsafe if the aircraft gets close to stall speed. Students must learn correct approach speed from their instructor and aircraft manual.
Not Understanding Colored Arcs
The colored arcs help pilots stay within safe operating limits. Beginners should learn what each color means early.
Depending Only on GPS Speed
GPS speed is ground speed, not airspeed. It should not replace the airspeed indicator for aircraft control.
Forgetting Airspeed During Climb or Descent
Airspeed can change quickly during climb or descent. Pilots must monitor it carefully.
Looking at Airspeed Only
Airspeed is important, but pilots must also check attitude, altitude, heading, vertical speed, and engine instruments.
Airspeed Indicator in Analog Cockpit vs Glass Cockpit
The airspeed indicator can appear differently depending on the cockpit type.
In older or traditional aircraft, it is usually a round dial. In modern glass cockpit aircraft, it is often shown as a digital airspeed tape.
| Feature | Analog Airspeed Indicator | Glass Cockpit Airspeed Tape |
|---|---|---|
| Display Style | Round gauge with needle | Vertical digital tape |
| Common Location | Instrument panel | Primary Flight Display |
| Speed Reading | Needle points to number | Current speed shown in a window |
| Colored Ranges | Colored arcs on dial | Colored bands on tape |
| Learning Value | Good for basic understanding | Useful for modern cockpit training |
| Common Use | Training aircraft and older aircraft | Modern aircraft and simulators |
Both systems show the same basic information: how fast the aircraft is moving through the air.
For beginners, learning the analog version first can make the digital version easier to understand.
Practical Tips to Learn the Airspeed Indicator Faster
Airspeed becomes easier when learned step by step.
Learn the Colored Arcs First
Start with white, green, yellow, and red markings. These give a quick understanding of safe speed ranges.
Understand Safe Speed Ranges
Know that different phases of flight require different speeds. Takeoff, climb, cruise, approach, and landing do not all use the same speed.
Practice With a Flight Simulator
A simulator can help you see how airspeed changes when you raise or lower the nose, increase or reduce power, or extend flaps.
Compare Airspeed and Ground Speed
Use simple examples to understand how wind affects ground speed but not airspeed in the same way.
Watch Takeoff and Landing Training Videos
Cockpit training videos can help beginners observe how pilots monitor speed during important flight phases.
Learn One Speed Term at a Time
Do not try to memorize every speed term at once. Start with indicated airspeed, stall speed, approach speed, and never-exceed speed.
Practice Instrument Scanning
Do not stare only at the airspeed indicator. Practice scanning airspeed, attitude, altitude, heading, vertical speed, and engine instruments.
Beginner Example
Imagine a student pilot sitting in a small training aircraft before takeoff.
Before starting the takeoff roll, the instructor asks the student to confirm that the airspeed indicator is reading zero. The student checks the instrument and confirms it.
As the aircraft starts moving down the runway, the student watches the airspeed needle begin to rise. This confirms that the instrument is working and the aircraft is accelerating.
At the correct rotation speed, the instructor tells the student to gently raise the nose. The aircraft lifts off and begins climbing.
During climb, the student checks the airspeed indicator to maintain the correct climb speed. If the nose is raised too much, airspeed may decrease. If the nose is too low, speed may increase but climb performance may reduce.
During cruise, the student sees the airspeed settle into the normal operating range. The instructor explains how power and pitch affect speed.
During approach, the student monitors airspeed carefully. The aircraft must not be too fast or too slow. Correct approach speed helps keep the landing stable.
Before touchdown, the student continues to understand how speed reduces gradually as the aircraft prepares to land.
This example shows how the airspeed indicator supports safe flying from takeoff to landing.
Quick Summary Table
| Airspeed Term | Meaning | Why It Matters |
|---|---|---|
| Airspeed | Speed through the air | Helps control the aircraft |
| Ground Speed | Speed over the ground | Helps with navigation and timing |
| Indicated Airspeed | Speed shown on the instrument | Used by pilots during normal flight |
| True Airspeed | Actual speed through the air after corrections | Useful for performance and planning |
| Stall Speed | Speed where wing may lose lift | Helps avoid unsafe slow flight |
| Rotation Speed | Speed to lift nose during takeoff | Helps safe liftoff |
| Climb Speed | Speed used during climb | Helps gain altitude safely |
| Approach Speed | Speed used before landing | Helps maintain stable approach |
| Never Exceed Speed | Maximum allowed speed | Prevents aircraft structural stress |
| Flap Speed Range | Speed range for using flaps | Helps safe landing configuration |
Airspeed Indicator Explained for Beginners: Simple Learning Order
Beginners can learn the airspeed indicator in this order:
- Understand what airspeed means.
- Learn the difference between airspeed and ground speed.
- Study the basic dial or speed tape.
- Learn the white, green, yellow, and red markings.
- Understand stall speed and approach speed.
- Learn how airspeed changes during takeoff and landing.
- Practice watching airspeed during simulator flying.
- Compare airspeed with attitude and power.
- Learn aircraft-specific speed limits from training material.
- Practice regular instrument scanning.
This order makes learning easier and avoids confusion.
FAQs
1. What is an airspeed indicator?
An airspeed indicator is a cockpit instrument that shows how fast the aircraft is moving through the air.
2. Why is the airspeed indicator important?
It is important because pilots use it to maintain safe speed during takeoff, climb, cruise, approach, and landing.
3. Is airspeed the same as ground speed?
No. Airspeed is speed through the air, while ground speed is speed over the ground.
4. What does the white arc mean?
The white arc usually shows the flap operating range. It is commonly related to slower speeds used during landing.
5. What does the green arc mean?
The green arc shows the normal operating speed range of the aircraft.
6. What does the yellow arc mean?
The yellow arc shows the caution speed range. Pilots use this range carefully and avoid it in rough air.
7. What does the red line mean?
The red line shows the never-exceed speed. Pilots should not fly beyond this speed.
8. Can GPS speed replace the airspeed indicator?
No. GPS usually shows ground speed, not airspeed. Pilots need airspeed for aircraft control and safety.
9. What happens if airspeed becomes too low?
If airspeed becomes too low, the aircraft may approach stall condition and lose lift.
10. How can beginners learn airspeed faster?
Beginners can learn faster by studying colored arcs, practicing in simulators, comparing airspeed with ground speed, and learning one speed term at a time.
Conclusion
The airspeed indicator is one of the most important cockpit instruments for safe flying. It helps pilots understand how fast the aircraft is moving through the air and whether the speed is safe for the current phase of flight.
This Airspeed Indicator Explained for Beginners guide shows that airspeed is not just a number. It affects lift, control, takeoff, climb, approach, landing, and overall aircraft safety.
Beginners should learn the airspeed indicator step by step. Start with the meaning of airspeed, then understand colored arcs, important speed terms, and the difference between airspeed and ground speed.
With regular practice, aviation learners can read the airspeed indicator confidently and build a strong foundation for safe aircraft handling.

