
Introduction
Learning to control an aircraft involves much more than simply moving the control column or pedals. Student pilots must understand how different flight controls work together to maintain a stable and desired flight attitude. One important system that helps reduce pilot workload is the aircraft trim system.
Aircraft trim allows pilots to reduce the pressure needed to hold a particular attitude. When used correctly, it can make straight-and-level flight, climbs, descents, and approaches more comfortable and manageable. For students, learning when and how to trim is an essential part of developing good flying habits.
This guide explains the aircraft trim system, its types, operation, common mistakes, and important safety considerations in simple language.
What Is an Aircraft Trim System?
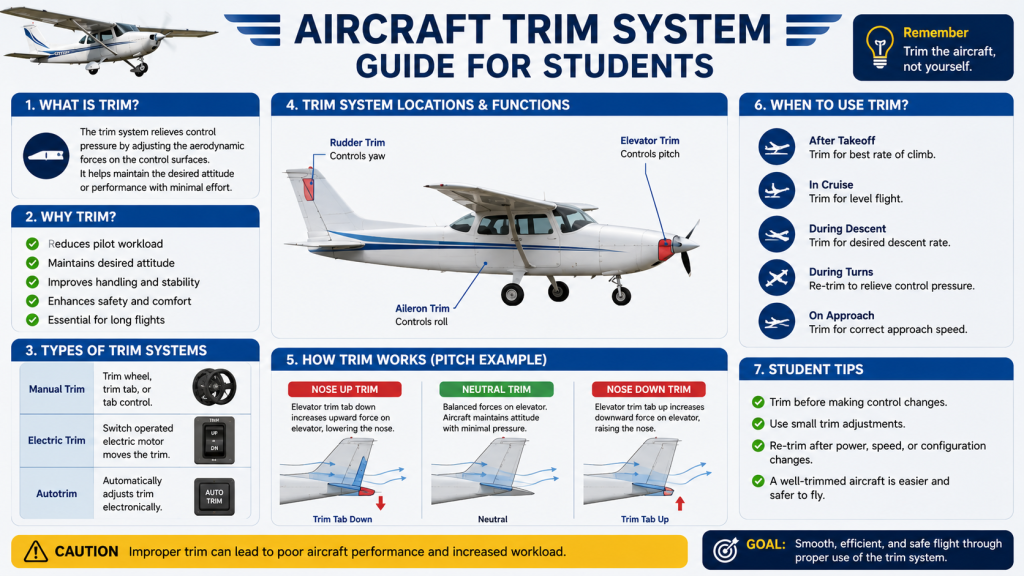
An aircraft trim system is designed to reduce the control forces that a pilot needs to apply continuously to maintain a desired flight attitude.
For example, after establishing a climb, a pilot may need to maintain a certain amount of back pressure on the control column. Holding that pressure for an extended period can be tiring. The pilot can use elevator trim to reduce this pressure so the aircraft can maintain the desired condition with less physical effort.
Trim does not replace the primary flight controls. Instead, it helps the pilot maintain the attitude or condition that has already been established.
How Does Aircraft Trim Work?
The exact design of a trim system depends on the aircraft. In many light aircraft, elevator trim works by changing the aerodynamic forces acting on the elevator or by adjusting the position of a trim tab.
A pilot first uses the primary flight controls to establish the desired attitude. Once the aircraft is stabilized, the pilot applies trim to reduce the control pressure.
A simple principle to remember is:
Control first, stabilize second, trim third.
For example, if an aircraft requires continuous back pressure to maintain its desired pitch attitude, the pilot can apply appropriate nose-up trim until the control pressure is reduced.
Trim should generally be used through small, controlled adjustments rather than large movements.
Types of Aircraft Trim Systems
Different aircraft may use different trim arrangements. Students should always become familiar with the specific aircraft they are flying.
| Trim Type | Basic Purpose | Common Application |
|---|---|---|
| Elevator trim | Reduces pitch control forces | Climb, cruise, descent and approach |
| Rudder trim | Reduces continuous rudder pressure | Correcting yaw forces |
| Aileron trim | Helps reduce continuous lateral control pressure | Maintaining balanced lateral flight |
| Manual trim | Allows the pilot to mechanically adjust trim | Common on many light aircraft |
| Electric trim | Uses an electrical system to adjust trim | Common in more advanced aircraft |
| Trim tab | Small aerodynamic surface that assists the primary control | Reducing control forces |
Elevator Trim
Elevator trim is particularly important for student pilots because pitch changes are common throughout a flight.
During a climb, descent, or change in airspeed, the aircraft may require a different elevator control force. Elevator trim helps the pilot reduce the pressure required to maintain the desired pitch attitude.
Rudder Trim
Rudder trim helps compensate for persistent yaw forces. Depending on the aircraft, these forces may result from engine torque, propeller effects, asymmetric thrust, or other aerodynamic factors.
Aileron Trim
Some aircraft have aileron trim to help reduce continuous lateral control pressure. It can be useful when an aircraft tends to roll slightly to one side because of loading, fuel distribution, or other factors.
Manual and Electric Trim
Manual trim typically uses a mechanical system controlled by a wheel, lever, or similar device. Electric trim uses an electrical actuator controlled by switches.
Students flying aircraft with electric trim should understand its operation carefully because trim can move relatively quickly compared with some manual systems.
Why Is Aircraft Trim Important for Student Pilots?
Proper trim technique is an important part of basic aircraft control.
Reduces Pilot Workload
Holding constant pressure on the flight controls can become tiring. Proper trimming reduces unnecessary physical effort.
Helps Maintain a Stable Attitude
Once the desired attitude has been established, appropriate trim can make it easier for the pilot to maintain that condition.
Improves Flight Comfort
An aircraft that is properly trimmed generally requires fewer continuous control inputs, which can make the flight smoother for both the pilot and passengers.
Supports Better Situational Awareness
When the pilot is not constantly fighting control forces, more attention can be directed toward navigation, instruments, traffic, communication, and other important tasks.
Develops Good Flying Habits
Learning to trim correctly helps students understand the relationship between airspeed, attitude, power, and control forces.
How to Trim an Aircraft
The exact procedure varies according to aircraft type, so students should follow their instructor’s guidance and the aircraft’s approved procedures.
A general training principle is:
1. Establish the Desired Attitude
Use the primary flight controls to establish the required pitch, bank, and flight condition.
2. Stabilize the Aircraft
Allow the aircraft to settle into the desired condition. Check the relevant instruments and outside references.
3. Apply Trim
Use the appropriate trim control to gradually reduce the pressure required on the primary flight control.
4. Release Pressure Carefully
Once the aircraft is properly trimmed, the pilot should be able to reduce unnecessary control pressure while continuing to monitor the aircraft.
5. Recheck the Flight Parameters
After trimming, continue monitoring airspeed, altitude, heading, attitude, and other relevant indications.
6. Make Small Corrections
If the aircraft’s condition changes, use the primary flight controls to make the required correction and then retrim if necessary.
The important point is that trim follows attitude control. A pilot should not use trim to make a major change that should first be accomplished with the primary flight controls.
Aircraft Trim During Different Flight Phases
Trim requirements can change throughout a flight because aircraft attitude, power, airspeed, and configuration change.
During Climb
When establishing a climb, the pilot may need a different pitch attitude and corresponding control pressure. Once the desired climb condition is established, appropriate trim can reduce the pressure required to maintain it.
During Cruise
After reaching the desired cruise condition, the pilot can trim the aircraft to reduce control forces. Small changes in power or airspeed may require additional trimming.
During Descent
Reducing power and changing the aircraft’s attitude can alter control forces. After establishing the desired descent condition, the aircraft may need to be retrimmed.
During Approach
Approach involves frequent changes in configuration, power, airspeed, and attitude. Students should make trim adjustments carefully and maintain proper aircraft control throughout the process.
During Landing and Go-Around
Trim settings may change significantly as the aircraft configuration and power change. Students should understand the aircraft’s specific procedures for landing and go-around operations and avoid relying on trim instead of proper control inputs.
Trim vs. Primary Flight Controls
Understanding the difference between trim and primary flight controls is essential for students.
The elevator, ailerons, and rudder are used to control the aircraft’s attitude and movement. Trim is primarily used to reduce the control forces associated with maintaining an established condition.
For example, a pilot uses the elevator to establish a desired pitch attitude. After the attitude is established, elevator trim can be used to reduce the pressure required to maintain it.
A Simple Example of Aircraft Trim
Imagine a student pilot is practicing straight-and-level flight.
The student establishes the correct attitude using the control column. After a few moments, the aircraft is stable, but the student notices that continuous back pressure is required to maintain the desired condition.
Instead of continuing to hold that pressure, the student can make a small appropriate trim adjustment. The control pressure should gradually decrease as the aircraft becomes properly trimmed.
The student then continues monitoring the aircraft rather than assuming that trimming means the aircraft will remain perfectly stable indefinitely.
If airspeed, power, configuration, or other conditions change, the aircraft may require another adjustment.
Common Trim Mistakes Made by Student Pilots
Students often need practice to develop smooth and accurate trim habits.
| Common Mistake | Why It Can Be a Problem | Better Approach |
|---|---|---|
| Trimming before establishing the attitude | Can lead to unnecessary trim changes | Establish and stabilize first |
| Over-trimming | May create excessive control forces in the opposite direction | Use small adjustments |
| Using trim instead of the elevator | Trim is not a substitute for primary control | Control the aircraft first |
| Ignoring airspeed | Trim changes can affect the aircraft’s condition | Continuously monitor airspeed |
| Making large electric-trim inputs | Electric trim can respond quickly | Use controlled, brief inputs |
| Failing to retrim after major changes | Control pressure may remain high | Reassess and retrim when appropriate |
Common Aircraft Trim Problems to Avoid
Over-Trimming
Applying too much trim can cause the aircraft to develop an unwanted tendency. If a student continues adding trim without understanding the aircraft’s response, the situation can become confusing.
Trimming Without Stabilizing
A common beginner mistake is attempting to trim while the aircraft is still changing attitude. It is usually easier to trim accurately after establishing the desired flight condition.
Forgetting to Monitor Instruments
Trim should never cause a student to stop monitoring the aircraft. Airspeed, altitude, heading, attitude, and other relevant parameters must continue to be checked.
Treating Trim as a Primary Control
Trim helps reduce control forces, but it should not be treated as a replacement for the elevator, ailerons, or rudder.
Ignoring Aircraft-Specific Procedures
Not every aircraft uses the same trim mechanism or procedure. Students should learn the trim system of the specific aircraft they are operating.
Aircraft Trim Safety Considerations
Safety should always come before convenience when using aircraft trim.
Students should understand the trim system before operating it and should follow the aircraft’s Pilot’s Operating Handbook (POH), Aircraft Flight Manual (AFM), flight-school procedures, instructor guidance, and applicable aviation regulations.
Before flight, students should understand the expected trim setting and the aircraft’s preflight requirements.
Electric trim systems require particular attention because an abnormal or runaway trim condition can create significant control forces. If a trim malfunction occurs, the pilot’s first priority is maintaining aircraft control and following the aircraft manufacturer’s approved procedures.
Students should never experiment with unfamiliar trim controls during a critical phase of flight.
Practical Tips for Students Learning Aircraft Trim
- Learn the location and function of every trim control before flight.
- Understand the aircraft-specific trim procedure.
- Establish the desired attitude before making major trim adjustments.
- Use small and smooth trim inputs.
- Keep monitoring the aircraft after trimming.
- Develop the habit of checking trim during changes in power and configuration.
- Do not use trim to compensate for poor aircraft control.
- Ask your instructor to demonstrate proper trim technique.
- Practice trimming during different flight conditions.
- Always prioritize aircraft control over troubleshooting a trim issue.
Important Considerations
Aircraft trim systems can vary considerably between aircraft. A technique that works on one training aircraft may not apply in exactly the same way to another.
Students should therefore avoid memorizing a single generic trim procedure and applying it to every aircraft. The aircraft’s POH or AFM and the instructions provided by a qualified flight instructor should take priority.
Good trim technique comes from understanding the relationship between attitude, airspeed, power, configuration, and control pressure. As students gain experience, they can learn to recognize control forces and make smoother adjustments.
Frequently Asked Questions
1. What is an aircraft trim system?
An aircraft trim system helps reduce the control forces required to maintain a desired flight attitude or condition.
2. Why do pilots use aircraft trim?
Pilots use trim primarily to reduce continuous pressure on the primary flight controls, helping lower workload and improve comfort.
3. What is elevator trim?
Elevator trim is a system designed to reduce the force required to maintain a particular pitch attitude.
4. Is trim the same as the elevator?
No. The elevator is a primary flight control used to change pitch. Trim is used mainly to reduce the control force needed after the desired attitude has been established.
5. When should a student pilot use trim?
Generally, a student should establish and stabilize the desired flight condition first and then use appropriate trim to reduce control pressure, following the aircraft’s specific procedures.
6. Can trim control an aircraft by itself?
Trim can influence the aircraft’s control forces, but it should not be considered a substitute for active aircraft control using the primary flight controls.
7. What happens if an aircraft is over-trimmed?
Over-trimming can create an unwanted control tendency and may require additional control input. Students should use small adjustments and monitor the aircraft’s response.
8. What is runaway trim?
Runaway trim refers to an abnormal condition in which the trim system continues moving or operating unintentionally. The pilot should maintain aircraft control and follow the aircraft manufacturer’s approved abnormal or emergency procedures.
9. Are aircraft trim systems manual or electric?
They can be either. Many aircraft use manual trim systems, while others use electric trim. Some aircraft may use a combination of different systems.
10. Why is learning trim important during flight training?
Understanding trim helps student pilots reduce unnecessary control pressure, manage workload, and develop better aircraft-control skills.
Conclusion
The aircraft trim system is a fundamental part of flight control that every student pilot should understand. Proper trimming helps reduce control pressure and allows pilots to maintain an established flight condition with less physical effort.
The key lesson for students is simple: establish the desired attitude, stabilize the aircraft, and then trim to remove unnecessary control pressure. With consistent practice and proper instruction, students can develop smooth trim habits that support safer and more efficient aircraft control.
Aircraft-specific procedures should always take priority, and students should rely on their instructor, POH or AFM, and approved training procedures when learning to operate a particular aircraft.

