
Introduction
A Primary Flight Display is one of the most important screens in a modern aircraft cockpit. It gives pilots the key flight information they need to understand the aircraft’s speed, altitude, direction, attitude, climb, descent, and navigation guidance.
For aviation students, the Primary Flight Display may look busy at first. It contains numbers, tapes, symbols, colors, lines, and flight guidance information. But once you understand each section step by step, the display becomes much easier to read.
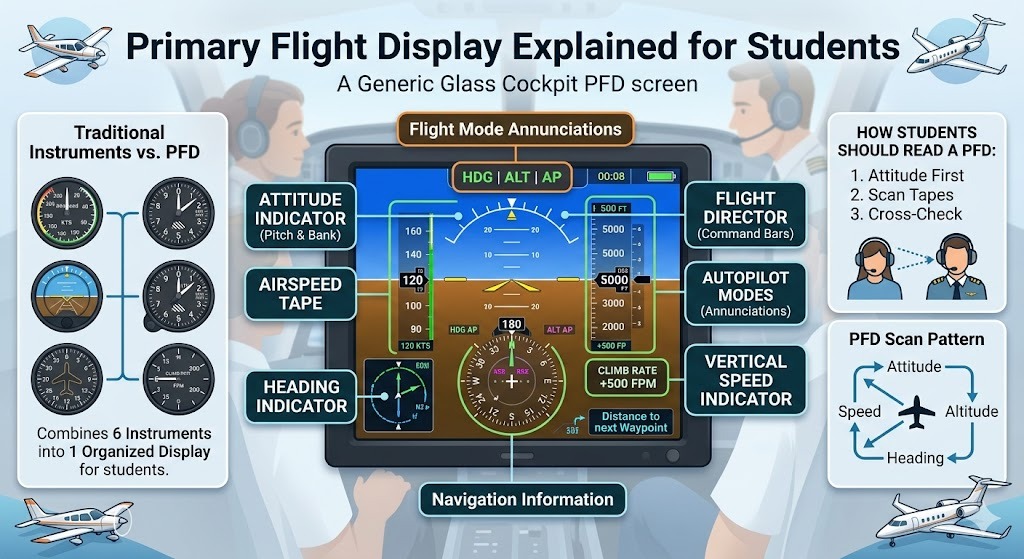
In older aircraft, pilots used many separate round instruments to get flight information. In modern glass cockpit aircraft, much of that information is shown together on one digital screen called the Primary Flight Display, or PFD.
This guide, Primary Flight Display Explained for Students, will help beginner pilots, aviation learners, and simulator users understand the PFD in simple English.
What Is a Primary Flight Display?
A Primary Flight Display is a digital cockpit screen that shows the most important flight information in one place. It is called “primary” because it gives the pilot the main information needed to control the aircraft safely.
A PFD usually shows:
- Aircraft attitude
- Airspeed
- Altitude
- Vertical speed
- Heading
- Flight director guidance
- Navigation information
- Autopilot mode information
In simple words, the PFD helps pilots answer important questions during flight:
- Is the aircraft level or turning?
- Is the aircraft climbing or descending?
- How fast is the aircraft flying?
- How high is the aircraft?
- Which direction is the aircraft heading?
- Is the aircraft following the correct flight path?
The PFD is a central part of the glass cockpit. A glass cockpit means a cockpit that uses digital screens instead of only traditional analog gauges.
Why Students Should Understand the Primary Flight Display
Aviation students should learn the Primary Flight Display early because many modern training aircraft, simulators, and commercial aircraft use glass cockpit systems.
Understanding the PFD helps students develop better cockpit awareness. Instead of looking at many separate instruments, students learn how to read important information from one organized screen.
Learning the PFD also helps students:
- Understand modern aircraft cockpit layout
- Improve simulator training
- Read flight instruments faster
- Build confidence during flight training
- Understand instrument flying basics
- Learn how pilots manage aircraft attitude, speed, and altitude
- Prepare for advanced aircraft systems
For beginners, the goal is not to memorize everything at once. The goal is to understand what each part of the PFD shows and why it matters.
Difference Between Traditional Instruments and PFD
Traditional aircraft cockpits usually have separate instruments for speed, altitude, heading, attitude, and vertical speed. A modern Primary Flight Display combines much of this information into one screen.
| Traditional Cockpit Instrument | Same Information on PFD | Why It Helps Students |
|---|---|---|
| Airspeed Indicator | Airspeed Tape | Shows speed clearly on the side of the display |
| Attitude Indicator | Artificial Horizon | Helps students understand pitch and bank |
| Altimeter | Altitude Tape | Shows height in a digital and visual format |
| Vertical Speed Indicator | Vertical Speed Scale | Shows climb or descent rate |
| Heading Indicator | Heading Tape or Compass Rose | Shows aircraft direction |
| Navigation Indicator | Course and Navigation Guidance | Helps students follow routes and approaches |
Traditional instruments are still very important for learning basic aviation. However, the PFD makes it easier to see connected flight information in one place.
Main Information Shown on a Primary Flight Display
A Primary Flight Display contains many sections. Each section has a specific purpose. Let’s understand the main parts in simple language.
Airspeed Tape
The airspeed tape shows how fast the aircraft is moving through the air. It is usually displayed on the left side of the PFD.
In traditional cockpits, airspeed is shown on a round airspeed indicator. On a PFD, speed is shown as a vertical tape with numbers moving up or down.
Pilots monitor airspeed during every phase of flight, including:
- Takeoff
- Climb
- Cruise
- Descent
- Approach
- Landing
Airspeed is important because the aircraft must stay within safe speed limits. If the aircraft flies too slowly, it may lose lift. If it flies too fast, it may exceed safe operating limits.
For students, the airspeed tape is one of the first PFD sections to understand. It helps them learn how aircraft speed changes when power, pitch, or drag changes.
Attitude Indicator
The attitude indicator is usually displayed in the center of the PFD. It shows the aircraft’s position compared to the horizon.
It helps pilots understand two important things:
- Pitch: whether the nose is up or down
- Bank: whether the aircraft is turning left or right
The attitude indicator is one of the most important parts of the PFD. It helps pilots keep the aircraft under control, especially when flying in clouds, haze, darkness, or poor visibility.
On the PFD, the attitude indicator often looks like an artificial horizon. The upper part usually represents the sky, and the lower part represents the ground. The aircraft symbol stays in the middle, while the horizon moves to show aircraft attitude.
For students, this is the heart of the PFD. If you understand the attitude indicator, you can better understand how the aircraft is moving.
Altitude Tape
The altitude tape shows how high the aircraft is flying. It is usually shown on the right side of the PFD.
In older cockpits, altitude is shown on a round altimeter. On a PFD, it appears as a vertical scale with numbers.
Pilots use altitude information to:
- Maintain assigned altitude
- Avoid terrain
- Follow air traffic instructions
- Plan climbs and descents
- Fly safe approach paths
Altitude is usually shown in feet. The PFD may also show selected altitude, which is the altitude the pilot or autopilot is trying to reach.
For students, it is important to understand the difference between current altitude and selected altitude. Current altitude is where the aircraft is now. Selected altitude is the target altitude.
Vertical Speed Indicator
The vertical speed indicator shows whether the aircraft is climbing, descending, or maintaining level flight.
It usually shows the rate of climb or descent in feet per minute.
For example:
- Positive vertical speed means the aircraft is climbing
- Negative vertical speed means the aircraft is descending
- Zero vertical speed means the aircraft is maintaining altitude
On the PFD, vertical speed is often shown near the altitude tape.
Students sometimes confuse altitude and vertical speed. Altitude tells you how high the aircraft is. Vertical speed tells you how quickly the aircraft is going up or down.
Pilots use vertical speed during climb, descent, approach, and landing preparation. It helps them control altitude changes smoothly.
Heading Indicator
The heading indicator shows the direction in which the aircraft is pointing. It may appear at the bottom of the PFD as a heading tape or compass-style display.
Heading is measured in degrees:
- North is 360 or 0 degrees
- East is 90 degrees
- South is 180 degrees
- West is 270 degrees
Pilots use heading information to follow routes, turn toward assigned directions, and maintain navigation awareness.
For students, heading is an important part of basic flight training. It helps them understand where the aircraft is pointing and how turns affect direction.
The PFD may also show selected heading. This is the heading selected by the pilot, often for autopilot or flight director guidance.
Flight Director
The flight director gives visual guidance to help the pilot follow a desired flight path. It does not fly the aircraft by itself, but it tells the pilot what attitude to follow.
On many PFDs, the flight director appears as command bars or guidance symbols. The pilot adjusts pitch and bank to follow these commands.
The flight director may guide the pilot during:
- Climb
- Descent
- Turns
- Approach
- Navigation tracking
- Autopilot-assisted flight
For students, the flight director can be confusing at first. A simple way to understand it is this: the flight director is like a visual instruction line. It shows where the aircraft should go, and the pilot flies to match it.
Navigation Information
The PFD may also show navigation information. This helps pilots follow a route or approach path.
Navigation information may include:
- Course guidance
- GPS route information
- Localizer guidance
- Glideslope guidance
- Distance information
- Deviation indicators
A course deviation indicator shows whether the aircraft is left or right of the selected course. A glideslope indicator helps pilots follow the correct vertical path during certain approaches.
For students, navigation information on the PFD becomes more important during instrument training. It helps connect aircraft attitude, heading, and route tracking.
Autopilot Mode Annunciations
The top area of the PFD often shows autopilot and flight mode information. This is called flight mode annunciation.
It tells pilots what the aircraft automation is doing or what mode is active.
For example, the PFD may show modes related to:
- Heading
- Altitude hold
- Vertical speed
- Navigation tracking
- Approach mode
- Autopilot status
For beginners, this area is very important because pilots must always know what the aircraft is actually following. Many automation mistakes happen when pilots think one mode is active, but another mode is controlling the aircraft.
Students should build the habit of checking flight modes clearly and often.
How Students Should Read a PFD
Students should not stare at one part of the PFD for too long. They should learn to scan the display.
A simple PFD scan pattern can be:
- Check attitude
- Check airspeed
- Check altitude
- Check heading
- Check vertical speed
- Check navigation guidance
- Check flight mode information
The attitude indicator is usually the starting point because it shows the aircraft’s basic position. Then the student checks speed, altitude, heading, and other information.
Good instrument reading is about cross-checking. For example, if the nose is raised, the student should expect changes in airspeed, altitude, and vertical speed. If these readings do not match expectations, the student should investigate.
Primary Flight Display During Different Flight Phases
The PFD is used during all phases of flight. The pilot’s focus changes depending on what the aircraft is doing.
Before Takeoff
Before takeoff, the pilot checks that the PFD is working properly. The pilot may check attitude display, airspeed indication, altitude setting, heading, flight director, and selected flight modes.
Takeoff Roll
During takeoff, pilots monitor airspeed carefully. The airspeed tape helps confirm that the aircraft is accelerating correctly.
Climb
During climb, pilots check attitude, airspeed, altitude, vertical speed, and heading. The PFD helps maintain safe climb performance.
Cruise
During cruise, pilots monitor altitude, heading, navigation route, and flight modes. The PFD helps confirm that the aircraft is stable and following the planned path.
Descent
During descent, pilots check vertical speed, altitude, airspeed, and navigation guidance. They use the PFD to manage a smooth and controlled descent.
Approach
During approach, the PFD becomes very important. Pilots monitor airspeed, altitude, attitude, heading, vertical path, and navigation guidance carefully.
Landing
During landing, pilots use visual references outside the aircraft, but they also monitor airspeed and attitude. The PFD supports stable approach and safe landing awareness.
Benefits of Primary Flight Display for Students
The Primary Flight Display offers many learning benefits for aviation students.
Easier Information Grouping
The PFD groups important flight information in one place. This makes it easier for students to connect speed, altitude, attitude, and heading.
Better Cockpit Awareness
Students can understand the aircraft’s condition faster because the main flight data is displayed together.
Faster Instrument Scan
A PFD can help students develop a faster instrument scan because they do not need to look across many separate gauges.
Useful for Simulator Training
Many flight simulators include glass cockpit displays. Learning the PFD helps students practice more effectively.
Helps Understand Modern Aircraft
Most advanced aircraft use digital cockpit systems. Learning the PFD prepares students for modern aviation training.
Supports Instrument Flying Concepts
The PFD helps students understand attitude flying, navigation tracking, altitude management, and approach guidance.
Common Mistakes Students Make While Reading the PFD
Students often make mistakes when learning the Primary Flight Display. These mistakes are normal, but they should be corrected early.
Looking Only at the Attitude Indicator
The attitude indicator is important, but students must also check speed, altitude, heading, and vertical speed.
Ignoring Speed Changes
Small pitch or power changes can affect speed. Students should keep checking the airspeed tape.
Confusing Altitude and Vertical Speed
Altitude shows height. Vertical speed shows climb or descent rate. These are connected but not the same.
Not Checking Flight Modes
Students may forget to check what mode the aircraft or autopilot is using. This can lead to confusion.
Depending Too Much on Digital Displays
A PFD is useful, but students should also understand backup instruments and basic flying skills.
Poor Instrument Scan
Randomly looking around the screen can cause missed information. A structured scan is better.
PFD vs MFD: Simple Difference
A Primary Flight Display and Multi-Function Display are both important in a glass cockpit, but they have different purposes.
| Feature | PFD | MFD |
|---|---|---|
| Full Name | Primary Flight Display | Multi-Function Display |
| Main Purpose | Shows main flight information | Shows maps, systems, weather, traffic, and other data |
| Common Location | In front of the pilot | Usually beside the PFD |
| Main Use | Flying and controlling aircraft | Planning, monitoring, and navigation support |
| Key Data | Attitude, airspeed, altitude, heading | Route, engine data, terrain, traffic, weather |
| Student Focus | Basic flight control | Wider aircraft and route awareness |
The PFD is mainly for flying the aircraft. The MFD is mainly for supporting the flight with additional information.
Backup Instruments and Safety
Even when an aircraft has a Primary Flight Display, backup instruments are still important. Digital screens can fail, sensors can give incorrect data, or electrical problems can affect display systems.
Backup instruments may include:
- Backup attitude indicator
- Backup airspeed indicator
- Backup altimeter
- Magnetic compass
Pilots are trained to cross-check information and use backup systems when needed.
For students, this is an important lesson: never trust one display blindly. Always understand the aircraft, compare information, and follow proper procedures if something looks wrong.
Practical Tips to Learn the Primary Flight Display Faster
Learning the PFD becomes easier when students use a step-by-step method.
Start With Attitude
First understand the center of the display. Learn how pitch and bank appear on the attitude indicator.
Learn Airspeed and Altitude Next
After attitude, focus on the airspeed tape and altitude tape. These are used constantly during flight.
Understand Vertical Speed
Learn how climb and descent rates are shown. Compare vertical speed with altitude changes.
Study Heading and Navigation
Once basic flight data is clear, move to heading, course, and navigation guidance.
Compare With Analog Instruments
Compare the PFD with traditional instruments. This helps students understand how old and new cockpit systems show the same information.
Use a Flight Simulator
A simulator helps students see how the PFD changes during takeoff, turns, climbs, descents, and landings.
Practice Daily Instrument Scan
Even a few minutes of regular practice can improve instrument reading speed and confidence.
Beginner Example
Imagine a student pilot sitting in a modern training aircraft with a glass cockpit.
Before takeoff, the instructor asks the student to check the PFD. The student confirms that the attitude display is level, altitude is set correctly, heading is visible, and airspeed is reading zero.
During the takeoff roll, the student watches the airspeed tape increase. This confirms that the aircraft is accelerating.
After liftoff, the student checks the attitude indicator to maintain a safe climb attitude. The altitude tape shows the aircraft climbing, and the vertical speed indicator shows the climb rate.
During cruise, the student checks heading and navigation guidance to make sure the aircraft is on the correct route. The airspeed and altitude remain stable.
During descent, the student watches the altitude tape and vertical speed indicator. The instructor explains how a smooth descent should be controlled.
On approach, the student checks airspeed, attitude, altitude, and navigation guidance more frequently. This helps maintain a stable approach.
This example shows how the PFD gives students a complete picture of flight conditions.
Quick Summary Table
| PFD Element | What It Shows | Why It Matters |
|---|---|---|
| Airspeed Tape | Aircraft speed | Helps maintain safe speed |
| Attitude Indicator | Pitch and bank | Helps control aircraft position |
| Altitude Tape | Aircraft height | Helps maintain correct altitude |
| Vertical Speed Indicator | Climb or descent rate | Helps manage altitude changes |
| Heading Indicator | Aircraft direction | Helps maintain navigation awareness |
| Flight Director | Visual flight guidance | Helps follow desired flight path |
| Navigation Guidance | Route or approach tracking | Helps stay on course |
| Flight Mode Annunciations | Active automation modes | Helps pilots understand system behavior |
| Selected Altitude | Target altitude | Helps manage climb or descent |
| Selected Heading | Target direction | Helps follow assigned heading |
Primary Flight Display Explained for Students: Learning Order
Students can learn the Primary Flight Display in this order:
- Understand the attitude indicator.
- Learn the airspeed tape.
- Learn the altitude tape.
- Study the vertical speed indicator.
- Understand heading information.
- Learn basic navigation guidance.
- Study flight director symbols.
- Understand autopilot mode annunciations.
- Compare the PFD with traditional instruments.
- Practice scanning the PFD in a simulator.
This order keeps learning simple and reduces confusion.
FAQs
1. What is a Primary Flight Display?
A Primary Flight Display is a digital cockpit screen that shows the main flight information, including attitude, airspeed, altitude, heading, vertical speed, and navigation guidance.
2. Why is it called a Primary Flight Display?
It is called primary because it shows the most important information pilots need to control the aircraft safely.
3. Where is the PFD located in the cockpit?
The PFD is usually placed directly in front of the pilot so that important flight information is easy to see.
4. What is the most important part of the PFD?
The attitude indicator is one of the most important parts because it shows the aircraft’s pitch and bank.
5. What is an airspeed tape?
An airspeed tape is the speed display on the PFD. It shows how fast the aircraft is moving through the air.
6. What is an altitude tape?
An altitude tape shows the aircraft’s current altitude. It is usually displayed on the right side of the PFD.
7. What is the difference between PFD and MFD?
The PFD shows main flight information, while the MFD shows additional information such as maps, weather, traffic, route, and aircraft systems.
8. Do students need to learn analog instruments if they use a PFD?
Yes. Learning analog instruments helps students understand basic flight principles and backup instrument use.
9. What is a flight director on the PFD?
A flight director gives visual guidance to help the pilot follow the desired flight path.
10. How can students learn the PFD faster?
Students can learn faster by using cockpit diagrams, practicing in simulators, learning one section at a time, and practicing a regular instrument scan.
Conclusion
The Primary Flight Display is the center of modern cockpit awareness. It combines important flight information such as airspeed, altitude, attitude, heading, vertical speed, navigation guidance, and flight modes into one organized screen.
For aviation students, learning the PFD step by step is very important. It helps build confidence, improves cockpit awareness, and prepares students for modern flight training.
This guide on Primary Flight Display Explained for Students shows that the PFD is not difficult when each section is understood clearly. Start with attitude, then learn speed, altitude, heading, vertical speed, and navigation guidance. With regular practice, students can read the Primary Flight Display confidently and use it as a strong foundation for safe flying.

